Have something you would like to see written here? Proud or curious about a particular hand? Email Bucknellbridge@gmail.com to see it written up in the monthly bulletin!
Each month Charlie will write up an interesting hand demonstrating a useful technique that you can take to the table!
July 2024
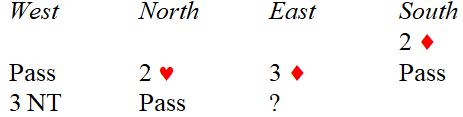
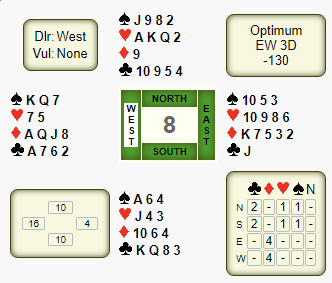
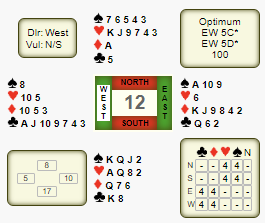
Mind Games Matter
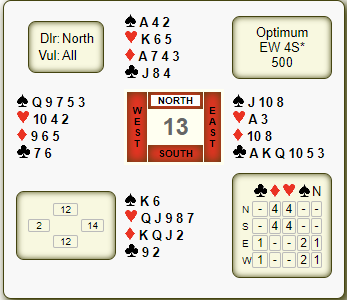
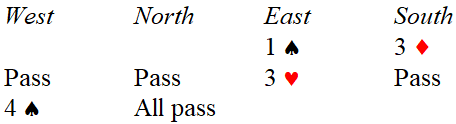
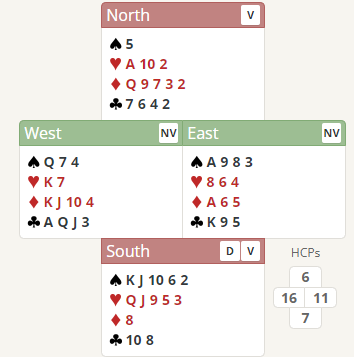
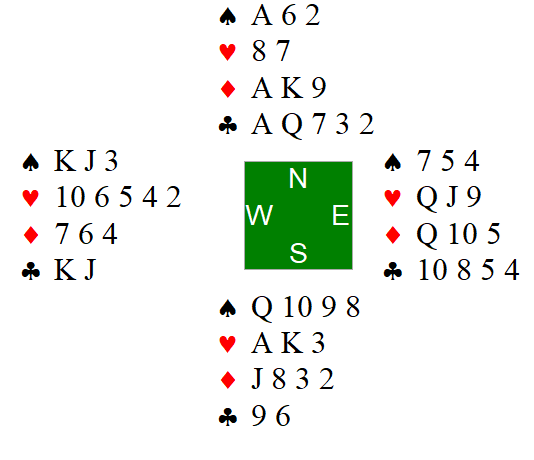
East leads the King of Clubs and partner plays the 7, followed by the 6 on the Ace of Clubs signifying an even number. Can you see how we might be able to defeat this contract? We already have 2 club tricks, and the Ace of Hearts is sitting in our pocket. We only need one more trick, and if partner has a hard trick it isn’t going anywhere, so we need to attempt to develop one. There is a chance (!) if partner has the 10 of hearts, we might be able to squeak out an extra trump trick! Let’s play a third club and see what happens. Dummy ruffs high and plays a heart to the King and our Ace. Now we can play a fourth club and partner’s ♥10 is promoted!
Could declarer do any better? It is a mind game at this point. East should continue with clubs even if they held A10(x) of hearts, to ensure their best chance of beating the contract. In order for declarer to make with West holding the ♥10, they need to ruff the 3rd club high and then immediately run the 9 of hearts. That feels very counter intuitive! And now you can see that if you run the 9 of hearts, you will make on the actual layout but lose whenever East holds the ♥10! How can declarer tell which layout it is? They can’t! It’s a pure guess! Generally, most players are quite good at bridge, its only when we test them with tough calls like this that provide opportunities for error.
June 2024
Tricks or Traps
This month we take a look at some of the action from the National County Pairs Championship – the Corwen Trophy. I was very pleased to finish 3rd with Jonathan Davis of Oxfordshire after a gruelling weekend of just under 100 boards. Congratulations to Alan Mould and John Holland for sealing the deal with a first place finish.
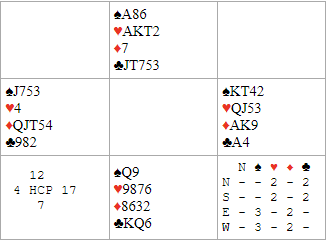
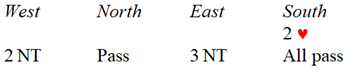
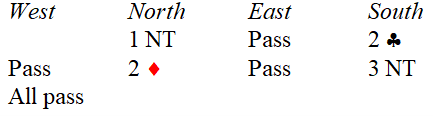
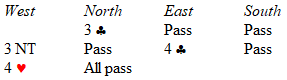
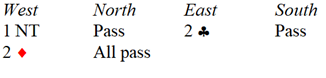
The board above was the first board of the event – helping to prove that every board is just as important as the next and we should be alert right from the get go. East opened 1♠ and South made a Weak Jump Overcall of 3♦. West passed, licking their lips and East went with 3♥. There is a good argument to be made for making a takeout double, slightly more flexible and we would prefer more hearts to balance with 3♥, but the pre-empts make life tough, as these bulletins show! West blasts 4♠ with a good hand and almost empty diamonds and we flip to the declarer play..
South leads the King of Diamonds and East needs to be very careful. The 3♦ overcall makes it extremely likely that North is void in diamonds, and there is a danger they may lose 2 diamonds (including the ruff), 1 club and 1 heart (if the suit doesn’t break kindly). So how can we avoid this? If we duck our diamond ace twice! We still lose 2 diamonds and 1 club, but we can now ruff the 3rd diamond in hand, draw trumps and use the ♦A to throw away our losing heart later. That’s tough psychologically to not fly ace at trick one!
May 2024
Tricks in Trumps

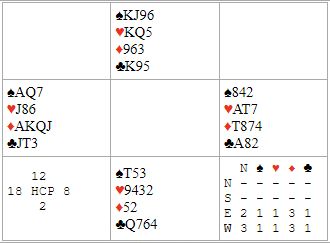
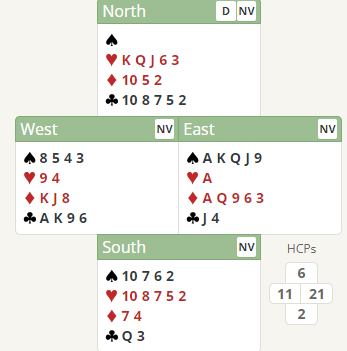
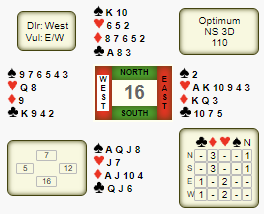
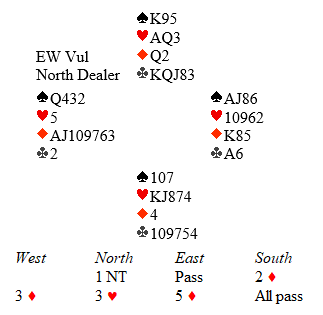
This month’s deal comes from the 5th round of the EBU Spring Foursomes competition, a heavy hitting knockout with multiple world champions competing for the toughest double elimination knockout that England has to offer. Indeed, this particular deal features Geir Helgemo, a famous Norwegian world champion whose card play is simply sublime. During this match, we played against the De Botton team and in this final stanza needed a bit of magic to even up the scoreboard. Let’s dive in.
After an adventurous and pushy auction to 4♠, North led the Ace of Hearts and switched to a club. Counting up tricks, you’ll notice we have 5 diamonds, 1 club, a couple of ruffs and that’s plenty. The difficulty is in managing to reach them all. If we play a heart to hand, opponents can win the ♠A and play on clubs to tap us. Instead, in good tempo, try playing a spade away from K1042! It is very tough for South to go up with Queen, they don’t have the information as to who has the ♠A and it might well give up a trick if declarer mis-guesses from AJxx. South played low, West played the Jack and North took the Ace somewhat begrudgingly. Another club and another to force a ruff, cash the King of spades and all of a sudden, tricks are coming likely candy. 10 tricks and 10 imps for a brave bid and a brave play.
April 2024
Counting up your points
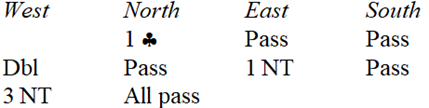
This month’s deal comes from the first match of the Olympiad Open Team Trials. North opened a short club and West balanced with a double. Even with a balanced hand, due to our large amount of points, it is best to start with a double. Protecting with 1NT tends to show only 11-14 points. In response, East bid 1NT, showing 8-10 points and West raised to 3NT, knowing that they had plenty of points for game.
South led the ♣4, and declarer now had 2 clubs tricks, 4 diamonds, 1 spade and 1 heart. The double heart finesse provided the 9th trick.
Declarer needs to be slightly careful – there is a danger that NS might run the clubs if a heart card is offside, and South has a 5th club. The key to success is that South couldn’t muster a bid and led a low, encouraging club. Declarer now knows that both hearts are right and the club position is working too. It is critical in any contract to count the points! It often lights up the whole hand like an open book.
March 2024
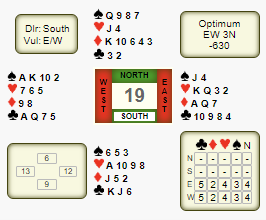
Descriptive Danger
This month’s hand comes from the EBU Easter Guardian Championship Pairs. South opened an Ekren 2♥, a bid which shows a weak hand with 5/4+ in the majors. Ekren can be quite a devastating pre-empt, because it takes away a lot of achievable game contracts. The only realistic remaining game contracts are 3NT and 5 minor. 5 minor is typically unattractive due to the high trick taking nature of it, and 3NT will scare many bidders that they need both major suits stopped! There is, however, one big downside – you tell the opponents how the hand is splitting! And we shall see in this deal from the Easter Guardian Championship Pairs (congratulations to Paul Barden and Claire Robinson for winning the event!) how that proved fatal for North South.
West overcalls 2NT and East makes a practical raise to 3NT.
North leads the ♣6, an innocent lead that doesn’t give anything away. How should you set about playing this hand? We know that South is extremely likely to be 55 in the majors, which leaves 3 minor suit cards. We suspect that North will hold the ♦Q as a result, but we can check for this first by gaining count in clubs. A quick count of our tricks leads us to 7 toppers and 1 more in diamonds, needing us to either take a spade finesse or heart finesse for our 9th. The danger is that North holds the ♥Ace and given the lack of heart lead, that seems quite probable. So we need to make sure that North is forced to give us a heart lead without us losing control of the hand.
Let’s start by cashing a second club, to see if South has 1 or 2 diamonds. In this case, we know they have (0-)1 diamond when they follow to the second club. We should play a diamond to the King, to confirm South’s shape, and then take the marked diamond finesse. Now, we cash out our remaining diamond and clubs, but we need to be careful! If we count our tricks, we can afford to lose 4, so we can lose 2 diamonds 1 heart and 1 spade, but only need one extra trick. If South has 5 spades, it means North only has 1, so we should cash the ♠A before returning to West with the clubs! Now we can exit the final diamond to North who has to give us a heart trick.
February 2024
Pre-emptive pressure
This month’s deal comes from the penultimate match in the European Mixed Trials Round Robin, and goes to demonstrate the utility of having flexible agreements.
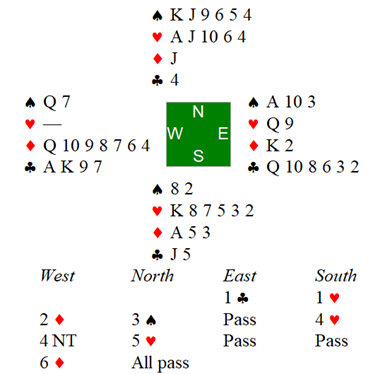
North opens an aggressive pre-empt with only five hearts, but with such a nice suit, shortage in spades and good shape at love all it looks clear to open. Certainly, it puts pressure on East who has a huge hand but needs a way to describe it! The Leaping Michaels 4♦ bid is a good gadget that operates on the idea that we should never pre-empt against a pre-empt. Therefore, a jump should show a strong hand, and since we care little for playing in minor suits, we need a way to show a two suiter. A nominal value of 18+ and 5/5 distribution is assigned to this bid.
South continues to add the pressure with a 4♥ bid, giving West no room to agree spades below 4♠. 5♥ is a committal bid, but with such a big fit and powerful cards in both minors, slam must be close if not already laydown. East, only struggling with the club suit, can rest assured that partner must have at least one club cue to suggest bidding a slam – they’re unlikely to have any heart honours, definitely no spade honours and at best ♦K(J) so there should be some top clubs. In order to bid a grand, it would be excellent to check how many keycards partner has – so we can use Roman Keycard Blackwood. Hold on – we have already bypassed 4NT! Shucks! Instead, we can use 5NT as Roman Keycard! This is just called “Extended Keycard”, but it is a great agreement to have with your partner, that when you bypass 4NT, you use 5NT as keycard instead. West shows one keycard with 6♣ and when East confirms all the keycards, West knows that the second top club covers partner’s missing round suit card (West knows East is 5X5Y where X+Y= no more than 3) and with the ♦KJ, that must be exactly what partner is looking for, and therefore bids 7♠!
January 2024
Fruitful Falsecards
After North-South reach 3NT on a Strong No Trump and Stayman auction, East leads aggressively with the ♥Queen. Since East only has 5 points, they want to try and find partner’s long suit, knowing that West has more points than East if they have a hope to defeat the contract. North ducks the first round and wins the continuation in dummy and takes a club finesse. When West contributes the ♣Jack and the ♣Queen wins the trick, they need to consider how they will reach 9 tricks. The plan was to originally tackle clubs since we always needed the club finesse to reach 9 tricks, but with a pending poor club break, spades look like a more tempting prospect, 2 clubs, 2 diamonds, 2 hearts and 3 spades. Given the lack of entries, North will start with a spade to the 10, finessing the Jack. West can now win with the ♠King! Now they return a heart to knock out the final heart and North will assume that East has the ♠Jack and will cash the ♠Ace and hook the ♠9. This will give West the final entry they need to score their remaining hearts!
Notice what happens if we win with the ♠Jack? Declarer has no choice but to finesse the ♠King and then fall back on clubs. Our partner is then forced to lead away from their ♦Queen and give the contract!
December 2023
A Multi-tude of Decisions
Playing in the EBU Year End Congress Swiss Teams, you are dealt the East hand and have to decide what to do when your opponents open with a Multi 2♦ which shows a Weak Two in either hearts or spades. 2♥ is a pass or correct bid, asking their partner to bid with spades, or pass with hearts. It would be nice to have bid that shows both minor suits, but it isn’t available unless we bid 4NT which is too high! Instead, with two five card suits, we should settle to bid our higher-ranking suit first, in this case, diamonds.
Partner, West, now bids 3NT! Should that end the auction or should East confess to having a more distributional hand? At Teams scoring, the most important part of a pre-emptive auction is to make sure that you end up with a positive score, since your side has the majority of the points. There is a temptation to look for a club fit but we should consider that partner did not have enough points to overcall 2♦ themselves. This means it is unlikely that we have enough points for a slam and that 3NT might just well be the final making contract. Therefore, even with our extraordinary shape, we should just pass!
November 2023
The Dog that didn’t bark in the Night

This month’s bulletin comes from a pairs game played online. It highlights the strength of constructing what the opponents didn’t do just as much as what they did do.
North starts off with a pre-emptive 3 Club bid, immediately putting EW under pressure. East, despite having both majors and a singleton club, is simply not strong enough to come into the auction and must wait for West to take an action (if any). At favourable vulnerability and with 4 card support, South may consider raising to 4 or even 5 Clubs, but at the table elected for a quiet pass which allowed West to bid 3NT. It is better to bid 3NT than to double since it provides a better account of your strength – if East were to respond 3 Hearts or 3 Spades to your takeout double, raising would be an uncertainty, and we would have wrong-sided our contract (we want to protect our pointed suit kings). East bids 4 Clubs as Stayman and West shows Hearts, ending the auction.
North leads the Queen of Clubs which is won by West. After cashing the Ace of Hearts and then the King of Hearts, declarer discovers that hearts are breaking 4-1 and it is a good time to pause and take stock of the hand.
We now know that North started with 6 or 7 clubs, and a side 4 card heart suit. This only leaves 2 or 3 cards remaining in diamonds and spades, which would guarantee a shortage in one of those suits. So declarer might ask themselves, why did North fail to lead their singleton? The answer, clearer when we can see all four hands, is that they must have a void! A logical step would be to identify that void as the spade suit, given that we have 9 of them between us. That would leave North with 2 or 3 diamonds (depending on how many clubs they started with). Now we have figured out the shape of the hand, what can we do about it? It would look natural to draw trumps and give up a spade trick to try and score 4 hearts, 2 clubs and 4 spades, but we don’t have the entries to do that! If we draw trumps and cash our club, when we lose the spade to South, we will be murdered in the club suit. If we don’t cash our club we can’t get back to it!
We must look for a new plan – and this is slightly counterintuitive since we are often taught to draw trumps when we can, but since we have determined that drawing trumps cannot work, we have to try something different. If we start by cashing the King of Clubs (pitching a diamond), draw one more trump (to leave the opponents with one trump), we can now afford to give up a spade to South, or to let North ruff (since they must either give us a ruff and discard or a diamond trick). So if we start by cashing our club, cashing a 3rd round of trumps (ending in West) and play a spade towards the Ace (winning the Ace when North doesn’t ruff) we can now concede a spade to South (or a ruff to North) at any point without either of them being able to play clubs safely, landing us with 10 tricks.
In any hand that we play, we should always be considering what the opponents have not done (in the auction or play) just as much as what they have done.
October 2023
X-Ray Vision
Our board this month is taken from the Friday morning game at the Oxford Bridge Club. It focuses on the importance of considering what card partner would play from different holdings and the strength of having a tempo in hand (being able to win a trick before the opponents can do something, such as drawing trumps). East opens 1♥ and South doubles, lacking the heart stopper to bid 1NT. West has enough spades to merit mentioning them and North sneaks in with a cheeky 2♦ overcall since they have some points and length. East rebids their hearts with a decent suit and South raises the free bid of diamonds to the 3 level, showing a good fit and reasonable hand. West can now raise to 3♥ since they know that East has 6 cards and that the ♥ Queen is a good card – and to outcompete the diamond suit. North feels some pressure and takes the push at favourable vulnerability (playing pairs) and bids 4♦. This ends the auction and East leads the ♥ Ace. South puts the dummy down and North calls for the 7, West following with the 8.
It is given to you that you are playing Reverse Attitude, which means that a low card will show that you like the suit and a high card that you don’t like the suit. The West hand has technically played their lowest heart, suggesting they like the suit, but what hearts must they have? If they had ♥ 86 or ♥ 85 would they encourage or discourage? They would likely encourage! This is because they want to ensure they score a ruff (even though dummy has ♦ AJT4, declarer doesn’t know the diamond position and may mis-guess the diamond suit now. If East plays 3 rounds of hearts declarer may try to ruff high and draw trumps. In any case, ruffing with the ♦ J is quite a scary prospect that the defence can certainly test declarer with. So when West, marked with a doubleton on the auction (which is usually a doubleton honour), plays the ♥ 8, it strongly suggests that they have exactly ♥ Q8 doubleton. So how does that help? East is looking at a trump control, that is to say that declarer cannot draw all the trumps without East winning a trump trick. They also now know that they have an entry to their partner’s hand. All of this points to switching to a spade. We can win the trump from declarer (taking care to split our honours when North leads towards dummy) and play a high (not the ♥ King!) heart to partner, signalling for a spade. Partner can play a spade back and we can trump it with our remaining diamond. This will land us with 2 diamonds and 2 hearts, setting the contract. I’m sure that North will think twice before competing against us in part-scores in the future with such sharp defence!
September 2023
The Power of Ducking
This hand came up in a recent teams match and highlights the power of a defensive duck. Traditionally, players look for a duck or holdup play in No Trumps to knock out dummy’s source of tricks, but let us see how it can be effective in a trump contract as well.
North opens a Strong No Trump and East overcalls to show Hearts and a minor. North balances with 2 Spades and buys the dummy. East starts off with 3 rounds of clubs, North ruffing the third. Declarer now plays a diamond to dummy’s Jack and calls for a spade. North beats West’s 6 with the 10 and now East.. ducks! North has no reason to suspect that West does not have KJx(x) in spades so wants to cross to dummy to repeat the finesse. Now they have a decision to make – if they cross in diamonds, there is a danger that someone might trump it if the suit is breaking 4-1, but if they cross in hearts that danger isn’t there. Declarer plays a heart to the Ace and calls for another spade, playing the Queen from hand and East wins the King. Now East can play the King of Hearts, felling declarer’s Queen and play another (top) heart allowing partner to throw away a diamond. Declarer can ruff it, and cash the Ace of spades (their final spade) but when trumps break 4-2 they can now only take one more diamond trick since partner will ruff the third round and cash their winning club. If we don’t duck the first round of spades, we cannot exit in hearts and force declarer. Exiting in clubs is not quite enough to beat the contract since partner can’t pitch their 3rd diamond, letting declarer score 4♠, 3♦ and the A♥. Declarer could always make by crossing with a diamond to take the second spade finesse, but the heart seems safer when the Spade King looks to be onside! Never be afraid to duck an honour offside, even in a suit contract!
August 2023
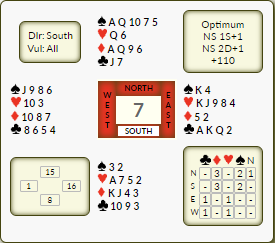
Junior World Championships!
I was delighted to be invited to coach the England U21 Team in their efforts at a World Championship Title in the Netherlands. The players performed admirably to push themselves into the Quarter Finals where they gave Israel an extremely uncomfortable and close match resulting in a narrow loss.
Here is one such board where the English Juniors gained over their Israeli counterparts:
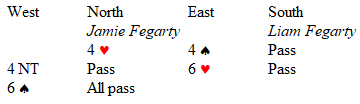
Jamie started applying the pressure with a 4♥ pre-empt. East is obliged into bidding 4♠ and West not unreasonably tried Keycard Blackwood. After East showed a void and an even number of Keycards, West signed off in 6♠, knowing that they were missing a Keycard. The burden of decision making now falls to Liam Fegarty who found himself on lead. You might consider leading a heart, but after East has shown a void that would be a non-starter. You want to think about the most likely way to defeat the contract and Liam envisioned that partner might be short in a suit and able to ruff something. The most likely suit, given Liam’s length, was clubs. Liam did very well to lead the ♣Ace and another club, which Jamie ruffed for down one. In the other room, the Israeli South led a heart and our boys wrapped up 12 tricks.
For those who are keen to read more about their challenging journey, I have written various blogs for the English Bridge Union which exhibit the ability of our talented youngsters who are the next generation of bridge!
Day 1
Day 2
Day 3
Day 4
Day 5
Quarter Finals
July 2023
Bidding With Garbage!
This month we take a look at what to do with the hands that we usually pick up – the ones with not many points! This deal comes from the Friday morning hybrid sessions at the Oxford Bridge Club.
In this hand, West has a standard Strong No Trump opening bid with 15-17 points and a balanced hand. I do also suggest upgrading into a Strong No Trump with a good 14 points frequently – the usual suspects to help upgrade are a source of tricks, good major suit holdings or honours that you wish to protect from the lead.
East does not have a particularly inspiring hand, with a whopping 4 points (and the Jack of Clubs certainly does not feel like it will hold it’s point value up either)! It looks like we might have an even split of points if partner has 16 or 17, but given that partner can upgrade as well, we may be looking at only 18. If we were to play our hand in No Trumps, one could envisage that we do not particularly have an entry to our hand outside of the King of Diamonds, meaning that partner would need the diamond suit themselves to make our hand worthwhile. There could easily be problems in clubs and potentially spades too. We have a shapely hand so we want to try and play in a trump contract, but how do we keep the bidding low whilst trying to find a fit? We cannot transfer since we do not have a 5 card major, nor a 6 card minor. We should instead try bidding Stayman! Whatever partner bids we will be delighted (mostly). If partner responds with 2 Hearts, we have actually managed to find a fit, which is certainly an improvement from the 1NT contract we were in before. If partner bids 2 Spades, whilst we may not have an 8 card fit if partner only has 4, the contract will be most playable since we can ruff partner’s clubs using our shorter trump stack and this will provide more tricks for partner than we could have done in 1NT. Finally, if partner bids 2 Diamonds, this will usually land us in an 8 card fit or better. It could land us in a 5-2 fit if partner has 3 Spades, 3 Hearts, 2 Diamonds and 5 Clubs but we accept that it happens sometimes!
In this hand, partner has a dreamy 4 card support for Diamonds and no major so the play in 2 Diamonds is considerably more comfortable than in 1NT.
The play requires some consideration – on the face of it we have 2 hearts to lose (and because the Ace of Spades is in South) and only one spade to lose but if we start by drawing all the trumps, we will notice that we suddenly only have one trump left in the West to ruff the 2 remaining hearts in East! We should start by removing the hearts from the West hand so that we can trump them before drawing trumps. This should lead to an easy 10 tricks! It is worth seeing that 1NT does not make either – losing 4 hearts, 1 spade and 3 clubs tricks, but of course we can score 5 diamonds and 1 club before they take all 8 of their tricks so it will be one down.
If you have a garbage hand, it does not necessarily mean you just have to pass! Think about how you can get partner to the contract with the best chance of making.
June 2023
The power of shape and shortage
This month’s deal is taken from the first match in the OCBL June Cup. North opens a Strong No Trump and South transfers to hearts. The first question is what should West do? They have a very exciting hand with 7 diamonds and 4 spades. Certainly, with such crazy shape they should take some sort of action! They could either double to ask for a diamond lead, or they could bid. The key is that doubling only asks for a diamond lead. Partner can raise with diamonds of course, but it doesn’t truly demonstrate the shape our hand has, doubling would be consistent with AKxxx and not necessarily much else (nor in terms of shape). Bidding at the 3 level at adverse vulnerability when the opponents have opened with a 15-17 No Trump with no guarantee of a fit strongly suggests some shape, which will help partner evaluate their hand. The other upside of bidding 3♦ is to make it harder for the opponents to agree hearts if they have a fit (specifically 5-3) since the No Trump bidder may not wish to bid 3♥ when partner has yet to guarantee any points. In this hand, North has an easier time of it. With ♥AQx and a doubleton (albeit Qx) in the opposition suit it is well worth showing a fit. In addition, they have a source of tricks in the club suit. All of this decision making lands us at 3♥ when it is time for East to bid. With 4 hearts and the opponents bidding up to 3♥, East knows that West has at most 1 heart. Therefore, having 4 little hearts is actually a benefit since the partnership will have no point wastage in the heart suit. The remainder of East’s hand is pure gold dust – two aces in the outside suits and the king of diamonds to go with partner’s suit. Furthermore, with only a doubleton club there is an opportunity to ruff clubs in the East hand (should West have more than 2). No card is wasted and this should encourage East to bid all the way up to 5♦. Neither North nor South should double – this sort of aggressive bidding strongly suggests (as is the case) that the hands are distributional, and only holding one ace in a suit that might not even stand up means that the defensive tricks may be too slow.
The play of the hand could be more difficult if the cards lay differently – declarer can cater both for diamonds 3-0 (since North bid 1NT they are known to hold the length in diamonds, so declarer should cash the ♦A first) and spades 4-1 so long as South has a singleton K/T/9 by cashing the Ace first. With diamonds and spades both breaking, declarer will have no trouble racking up 7 diamonds, 3 spades and 1 club.
Just because the opposition have shown a good hand does not mean that we do not have a game on our way!
May 2023
High-Pressure High-Level Decisions
This month’s deal comes from the Schapiro Spring Foursomes, the EBU’s premier Knockout event. It is an event that is packed with World Class players and as such, is extremely difficult to win! The format is a double elimination knockout so each match is crucial to your team’s survival.
This deal demonstrates the idea of taking insurance in a teams game. East-West are non-vulnerable whilst North-South are vulnerable, which already starts to suggest that a save might be a good idea. Let’s start with the auction.
East opens 1♣ with light values because they have a good primary suit and it fits the rule of 20 (where your two longest suits and points add up to 20 you can open). It is becoming more frequent in the modern game to open more aggressively with length, especially at non vulnerable. South has a normal 1♥ overcall (the suit quality is not sufficient for a 2♥ weak jump overcall at adverse vulnerability) and West has no difficulty bidding 2♦. North has a powerful hand with plenty of shape, so makes a fit jump with 3♠. South signs off in 4♥ and now West has their first decision – should they simply bid 5♦ or is there a way to include partner’s clubs in the game? 4NT in a competitive auction frequently shows two places to play, which would suggest clubs and diamonds here. It seems a good bid, allowing EW to find the right strain. North tries to shake the boat by bidding 5♥ to keep EW from identifying their best fit and when the bidding comes back to West, they need to decide if they should bid again or defend. When you are in a high level auction, or any auction that may have pre-emptive hands in, the best thing to do is to attempt to go positive. The other consideration is what may be cheap – it is unclear in this hand whose hand it is (i. e. which side should be aiming to go positive and which should be saving), so it could easily be that 5♥ goes down and 5♦ was also going off, or that both contracts are making. In these cases, there is “the insurance” option – bid again. If 5♥ was making and 6♦ goes down, it is a good sacrifice. If 5♥ is not making and 6♦ goes down, it is possibly only 5 IMPs. If 6♦ is making then it is definitely a good bid. I should point out that bidding 6♦ on the West hand is far from clear – you might choose 5NT to offer partner choice of suits again. The upside to 6♦ is that you can conceal your hand (and you also protect your Queen of S).
In this hand, 6♦ rolls in, and at the other table the opponents chose to defend 5♥ which also made, for a double swing!
In short, do not be scared of taking an insurance option if you are not sure whose hand it is at high levels!
April 2023
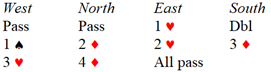
Pre-Emptive Pressure!
3♣
3♥ 4♣ 4♥ Pass
Pass 5♣ 5♥ All Pass
This month’s deal also comes from the Oxford Bridge Club Friday Morning Hybrid Session. I am also pleased to announce on their behalf that they are running a new Monday morning hybrid session.
In first seat at favourable vulnerability West should push for an aggressive pre-empt, 3♣ certainly seems right. This also allows East to bid 3NT should they have a suitable hand. Now the crunch from the pre-empt! North has a very shapely hand with both majors but not very many points. A good principle to adhere to is that if your hand has the shortage in the enemy long suit then the onus of bidding is on you. With only 1 club North should strive to take some sort of action. There are two choices available in reality – 3♥ or 4♣. The latter being a Michaels Cue Bid and the former a natural overcall. Whilst the Michaels bid would show more cards in North’s hand, partner will expect more strength since it forces partner to bid a game in a major. The benefit of 3♥ is that it is strictly non forcing. This gives partner space to show their hand as well. It also means that partner will lead the right suit should they end up on lead. Pass is a reasonable option but with such a shapely hand it must be right to compete – note that the strength of the hand lies in the shape rather than the high card points. We are not pre-empting the pre-empt as we are constructively bidding in the hope of making a game. East now has a decision – they can pass quietly, raise clubs or even bid diamonds. I would recommend raising clubs. Partner has shown a long suit and we can support it, you will never particularly go far wrong if you always support your partner, the only question here is how high? At favourable vulnerability and with the opponents almost certainly having a heart fit (we are short after all!) then it might just be right to plonk 5♣ on the table immediately and give the next hand a tough decision, but the decision taken at the table was 4♣. South raised to 4♥, a bit cautious but at pairs that may well be the right thing to do, it is important to take a positive score out of a pre-emptive auction. East came back in with 5♣ and now South took the push to 5♥ to show their extras, ending the auction.
The auction was interesting enough, let us look at the play! Should East lead a club, West will surely win and switch to a spade, leading to down one on a ruff. After such an aggressive auction there is a case for leading the ♠A, and then looking at the dummy East duly switched to the ♣Q, not knowing if West had a singleton spade. Declarer can now make it by putting up the ♣K but how are they to know that West has the singleton spade and not East? The lead surely looks like a singleton so North plays low to keep the hand with shortage on lead. Of course if East did have a singleton spade, West needs to overtake the ♣Q with the ♣A and fire back a spade – not so easy in practice. Since West has the singleton (now void) spade, they need to signal to partner to switch to a spade. The right card to play is the ♣J! East will see this as a suit preference signal — a simple attitude signal could have been given with the ♣2 (or ♣T based on your methods) so the ♣J should be a wake-up card asking East to switch and that will defeat the contract.
March 2023
So many choices!
Pass 1NT*
Pass 2♣** Pass 2♠
Pass 3NT All Pass
*12-14 **Stayman
This month’s deal comes from the Oxford Bridge Club Friday morning hybrid session. East should push straight for game here – partner may have some suitable 12 counts where 3NT will roll in! They may even pass some 13 counts where they view their hand as minimal and we might miss that 25 high game. At most tables North led a systemic diamond (typically the ♦4, being fourth best) and now declarer has to create their plan. There are 2 guaranteed tricks in spades and 1 more in both diamonds and clubs so we need to find 5 more. The spade finesse offers an extra trick (not two, since South should cover the ♠J if they have the queen, which means the ♠2 won’t have a home). Hearts also look promising for at least 1 trick, possibly 2 or 3 depending on the layout (Axx onside would provide 3 tricks in the suit for one loser). Diamonds might provide an additional trick if the king is right and clubs could provide 2 or 3 extra tricks based on the honour positions. All in all, we have plenty of chances. How do we know which suit is best to attack? At pairs we often want to score as many tricks as possible, and that is how we should decide how to play this hand as well. Clubs and hearts offer the most opportunity for tricks so we should look into those two suits first. We should take the diamond finesse at trick one (play the ♦Q) and when that wins we can attack clubs. We should start by running the ♣10. Today, we are very fortunate that it wins and we can now repeat the club finesse knowing we have 4 club tricks. You must take care to play the ♣4 on the second round in case the hearts also lie favourably, it will give you an entry to dummy. Note that if clubs are 4-1 you still have the heart entry to repeat the finesse. After winning the third club we turn our attention to hearts (keeping that club entry to dummy). We play a heart to the king and a savvy defender will duck the ♥A. Now we can take the losing spade finesse, the defence will knock out the diamond entry to dummy and we have to count our tricks. We have 3 spades, 2 diamonds, 1 heart and 3 clubs. So we have made our contract! Brilliant! Because we do not have control in hearts we should cash our winning 4th club first, since the defence will otherwise run amok in diamonds. After winning the club (that we so carefully preserved in the dummy) we can now exit a diamond and hope that we win a heart “in the wash”.